「\x8ew」のような文字化けを解読する
Linuxでアプリを実行した際、以下のようなエラーが出力されたが文字化けしていて読めなかった。
\x8ew\x92\xe8\x82\xb3\x82\xea\x82\xbd\x83\x82\x83W\x83\x85\x81[\x83\x8b\x82\xaa\x8c\xa9\x82\xc2\x82\xa9\x82\xe8\x82\xdc\x82\xb9\x82\xf1\x81B
ググッたら簡単な解読方法を発見した。
1. テキストエディタなどを使って文字化け部分の「\x」を「%」に置換する
\x8ew\x92\xe8\x82\xb3\x82\xea\x82\xbd\x83\x82\x83W\x83\x85\x81[\x83\x8b\x82\xaa\x8c\xa9\x82\xc2\x82\xa9\x82\xe8\x82\xdc\x82\xb9\x82\xf1\x81B
↓
%8ew%92%e8%82%b3%82%ea%82%bd%83%82%83W%83%85%81[%83%8b%82%aa%8c%a9%82%c2%82%a9%82%e8%82%dc%82%b9%82%f1%81B
2. 「http://www.google.com/search?hl=ja&q=」の後に上記文字列をつなげてブラウザでアクセスする
http://www.google.com/search?hl=ja&q=%8ew%92%e8%82%b3%82%ea%82%bd%83%82%83W%83%85%81[%83%8b%82%aa%8c%a9%82%c2%82%a9%82%e8%82%dc%82%b9%82%f1%81B
3. グーグルの検索文字列の覧に文字化けが修正された文字列が表示されている、はず
[Android]Hello Worldを出力するアプリ
画面にHello Worldという文字列を出力するアプリを作成する
開発環境は開発環境の構築を参照。
1. 新規プロジェクトの作成
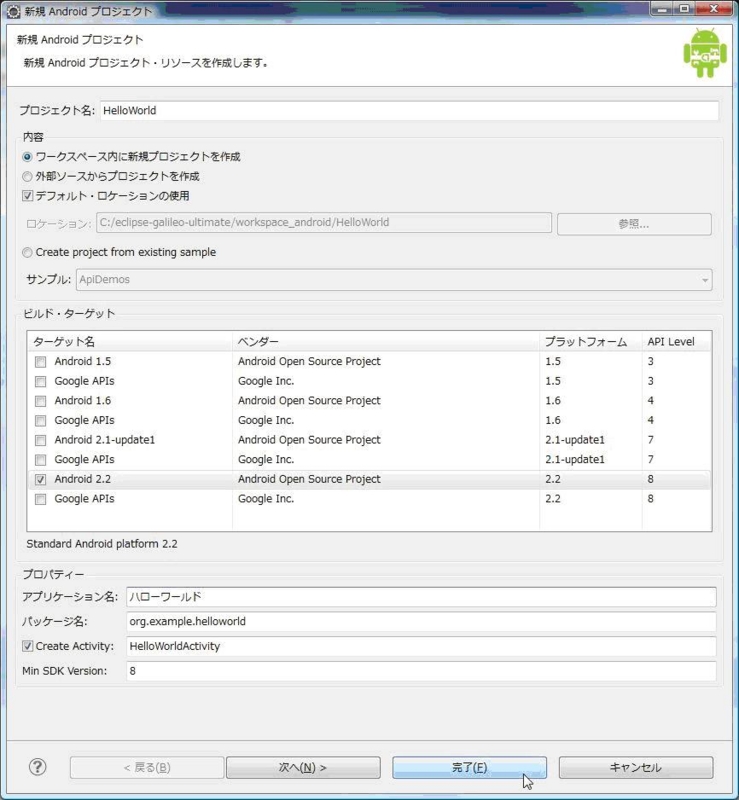
Eclipseの[新規プロジェクト作成]から[Androidプロジェクト]を選択する。

・プロジェクト名:HelloWorld
  Eclipseのプロジェクト名。分かりやすい名前を付ければよい。
・ビルド・ターゲット:Android 2.2をチェックする
・アプリケーション名:ハローワールド
  アプリケーションの名前。この名前でAndroidケータイに登録される。
・パッケージ名:org.example.helloworld
・Create Activity:HelloWorldActivity
  Activityを継承するクラス名を指定。Activityはアプリのライフサイクルを管理するクラスで、Androidアプリでは必ず実装しなければならない。
・Min SDK Version:8
  Min SDK Versionはビルド・ターゲットのAPI Levelの数値を入力する。
3. プロジェクト構成
手順2が完了すると、プロジェクトが下記のような構成で作成されている。

| ファイル名 | 説明 |
|---|---|
| HelloWorldActivity.java | アプリケーションの処理を記述するファイル |
| R.java | リソースIDを管理するファイル。プロジェクト作成時に自動生成され、その後はビルド時に自動更新される。変更することは禁止されている。 |
| res/drawable-* | 画像データを置くディレクトリ。各ディレクトリにイメージを配置する事で、解像度によって使用するイメージを切り替える事ができる。 |
| res/layout/main.xml | 画面レイアウトを定義するファイル |
| res/values/strings.xml | Androidで使用する文字列を定義するファイル。(任意のファイル名で文字列や配列、スタイルなどを定義できる。) values-en、values-jaのように言語ごとにディレクトリを作成する事で国際化に対応できる。 |
| AndriodManifest.xml | アプリケーションの構成を定義しているファイル |
| default.properties | バージョン管理に使用するファイル |
以降、ソースコードの説明。
4. main.xml
<?xml version="1.0" encoding="utf-8"?>
<LinearLayout xmlns:android="http://schemas.android.com/apk/res/android"
    android:orientation="vertical"
    android:layout_width="fill_parent"
    android:layout_height="fill_parent"
    >
<TextView
    android:layout_width="fill_parent"
    android:layout_height="wrap_content"
    android:text="@string/hello"
    />
</LinearLayout>
| タグ | 説明 |
|---|---|
| LinearLayout | リソース(ボタン、テキスト欄など)垂直に並べる |
| TextView | text属性で指定した文字列を出力する |
| android属性 | 説明 |
|---|---|
| orientation | vertical:垂直に並べる horizontal:水平に並べる |
| layout_width | fill_parent:枠を横幅いっぱいに設定する wrap_content:枠を文字列と同じ幅に設定する |
| layout_height | fill_parent:Buttonを横幅いっぱいに使用するために設定 wrap_content:枠を文字列と同じ幅に設定する |
| text | 出力したい文字列を入力する。 または、strings.xml ファイルに定義した値を記述する。この場合「リソースのタイプ/リソース名」と入力する。 |
5. HelloWorldActivity.java
現在のアプリの状態に関する情報はsavedInstanceStateにまとめられており、メモリ中に存在する。
package org.hello.world;

import android.app.Activity;
import android.os.Bundle;
import android.widget.TextView;

public class HelloWorldActivity extends Activity {
    /** Called when the activity is first created. */
    @Override
    // Hello Worldを表示する。
    public void onCreate(Bundle savedInstanceState) {
        super.onCreate(savedInstanceState);
        setContentView(R.layout.main);  //setContentView:画面を生成する。
    }
}
6. R.java
リソースIDを管理するファイル。リソースとは画面に配置したボタンやテキスト欄のことである。R.javaは初めてプロジェクトをビルドした時に作成され、その後ビルドが行われるたびに自動的に更新されていく。その為、ユーザーはリソースの追加だけを行っておけばリソースに対するIDの管理などは行う必要はない。
/* AUTO-GENERATED FILE.  DO NOT MODIFY.
 *
 * This class was automatically generated by the
 * aapt tool from the resource data it found.  It
 * should not be modified by hand.
 */

package org.hello.world;

public final class R {
    public static final class attr {
    }
    public static final class drawable {
        public static final int icon=0x7f020000;
    }
    public static final class layout {
        public static final int main=0x7f030000;
    }
    public static final class string {
        public static final int app_name=0x7f040001;
        public static final int hello=0x7f040000;
    }
}
7. strings.xml
アプリケーションで使用する文字列を定義するファイル。アプリケーション内では文字列を使いまわす可能性が高いので、xmlファイル形式で1箇所にまとめている。ハローワールドという値を取得したい場合は、「@string/app_name」と記述する。
<?xml version="1.0" encoding="utf-8"?>
<resources>
    <string name="hello">Hello World</string>
    <string name="app_name">ハローワールド</string>
</resources>
8. AndroidManifest.xml
アプリケーションがどのような挙動を行いどのような情報を公開し、どのようなデータを処理でき、またはどのようにしてそれらを起動するかという情報を記述したファイル 。
<?xml version="1.0" encoding="utf-8"?>
<manifest xmlns:android="http://schemas.android.com/apk/res/android"
      package="org.hello.world"
      android:versionCode="1"
      android:versionName="1.0">
    application android:icon="@drawable/icon" android:label="@string/app_name">
        <activity android:name=".HelloWorldActivity"
                  android:label="@string/app_name">
            <intent-filter>
                <action android:name="android.intent.action.MAIN" />
                <category android:name="android.intent.category.LAUNCHER" />
            </intent-filter>
        </activity>

    </application>
    <uses-sdk android:minSdkVersion="8" />

</manifest>
9. default.properties
バージョン管理に使用するファイル。本ファイルは自動生成される。また後から書き換えてはいけない。下記の例ではビルド・ターゲットのAPI Levelのバージョンが記述されている。
# This file is automatically generated by Android Tools.
# Do not modify this file -- YOUR CHANGES WILL BE ERASED!
#
# This file must be checked in Version Control Systems.
#
# To customize properties used by the Ant build system use,
# "build.properties", and override values to adapt the script to your
# project structure.

# Project target.
target=android-8
10. icon.png

11. 実行結果
Eclipseで[プロジェクト名を右クリック]->[実行]->[Androidアプリケーション]をクリックするとAndroidのシミュレータが起動する。
実行するとまずシミュレータが起動する。ホーム画面が表示される。

ロックを解除すると、ハローワールドアプリが自動起動する。

[Android]開発環境の構築
Androidとは2007年11月にGoogle社が発表した、携帯電話でのソフトウェア実行環境のことである。オープンソースOSのLinuxをベースとしている。Linuxカーネル2.6以上で動作する。
- Android用アプリケーション
Android用アプリケーションはJava言語で開発する。統合開発環境の「Eclipse」を利用する。Eclipse用に開発を補助するためのAndroid SDKというプラグインが提供されている。
- 開発環境の構築
1. JDK(Java Development Kit)のインストール
JDKのダウンロードページにアクセスしインストーラをダウンロードする。「Java Standard Edition」項目の[JDKダウンロード]をクリックするとダウンロードが始まる。

ダウンロード後、インストーラを起動するとウィザードが開くので指示に従いインストールを完了する。全てデフォルトでよい。
2. Eclipseをインストールする
Eclipse 日本語化 - MergeDoc ProjectにアクセスしEclipse本体の圧縮ファイルをダウンロードする。ダウンロードしたzipファイルをインストールしたい場所に解凍する。
AndroidのサイトからAndroid SDKの圧縮ファイルをダウンロードする。ダウンロードしたファイルを任意の場所に解凍する。
システム環境変数に下記を追加する。
[スタート]->[コンピュータ]を右クリック->[プロパティ]->[システムの詳細設定]->[環境変数]->[システムの環境変数]の変数「path」に、下記を追記する。

;C:\eclipse-galileo-ultimate\android-sdk-windows\tools;
4. EclipseにAndroid用のプラグイン(ADT)を入れる
 4.1. Eclipseを起動する

 4.2. [ヘルプ]メニューの中の[新規ソフトウェアのインストール]メニューをクリック

 4.3. 「インストール」ダイアログが表示される。

   「作業対象」に「https://dl-ssl.google.com/android/eclipse/」を入力し「追加」ボタンをクリックする。

 4.4. 「サイトの追加」ダイアログが表示されるので、「名前」を適当に入力する。(例:Android Plugin)。入力したら「OK」ボタンをクリックする。

 4.5. 「Developer Tools」のチェックボックスをチェックし、画面下部の「次へ」ボタンをクリックする。

 4.6. インストール項目が表示される。「次へ」ボタンをクリックする。

 4.7. 「使用条件の条項に同意します」にチェックを入れ「完了」ボタンをクリックするとインストールが開始される。

 4.8. インストールが完了したらEclipseを再起動する。
開発環境が整ったので早速アプリを作ってみる。
Hello Worldを出力するアプリ
- 参考サイト
Gihyo.jp:第2回 Androidアプリ開発のための環境構築
JDK6のダウンロード
Android SDK インストール
ADT Plugin for Eclipseのインストール
ファイル内の文字列を変換する
ファイル内の特定の文字列を変換したい場合、sedコマンドを使用する。
- コマンド
sed -e 's/変換前の文字列/変換後の文字列/g' 入力ファイル > 出力ファイル
- 例
下記の内容のファイルがあるとする。ファイル名はfruit.txtとする。
---------------------------
apple orange grape apple
orange grape apple orange
grape apple orange grape
---------------------------
ファイル内の「apple」という文字列を「りんご」に変換し、fruit_next.txtという名前のファイルに出力する場合、次のようなコマンドを実行する。
sed -e 's/apple/りんご/g' fruit.txt > fruit_next.txt
fruit_next.txtの内容
---------------------------
りんご orange grape りんご
orange grape りんご りんご
grape りんご orange grape
---------------------------
gを除いた場合、それぞれの行の最初にマッチした文字列のみを変換する。
sed -e 's/apple/りんご/' fruit.txt > fruit_next.txt
fruit_next.txtの内容
---------------------------
りんご orange grape apple
orange grape りんご apple
grape りんご orange grape
---------------------------
[Linux::Apache]モジュールを追加する
ApacheにSSL通信を行うためのmod_sslというモジュールを追加する手順
1. mod_soが組み込まれているかを確認する
mod_soとはApacheに後からモジュールを追加するためモジュールのこと。
# /usr/local/apache2/bin/httpd -l
 ---略---
mod_so.c
mod_soはApacheコンパイル時にしか組み込む事ができない。mod_soがなければ、Apacheを再インストールする必要がある。再インストールする場合はApacheのインストールを参照。
2. インストールするモジュールのソースファイルを確認する
xはバージョン
# ls /usr/local/src/httpd-x.x.x/modules/mod_so.c
mod_so.c
もしソースファイが無ければApacheのサイトのダウンロードページからApacheのインストールファイルをダウンロードする。モジュールのソースはインストールファイルの下記の場所にある。
/usr/local/httpd-x.x.x/modules/metadata
3. コンパイル
- モジュールのソースファイルが置いてある場所に移動する
xはバージョン
# cd /usr/local/httpd-x.x.x/modules/metadata
- コンパイルする
apxsコマンド: Apacheの拡張モジュールを、ビルドしてインストールしてくれるコマンド。
# /usr/local/apache2/bin/apxs -c -i -a mod_ssl.c
4. 設定ファイルhttpd.confの編集
Apacheの設定ファイルhttpd.confで、mod_sslをロードできるように設定する。
httpd.confを開く。
# vi /usr/local/apache2/conf/httpd.conf
下記を追加する。(apxsコマンドでインストールすると、自動的にhttpd.confに設定が追加されている。もし追加されていなければ追加する。)
------------------------------------------------
LoadModule rewrite_module modules/mod_rewrite.so
------------------------------------------------
- 参考したサイト
[Linux::Apache]インストール
Linux(CentOS 64bit)にApacheをインストールする方法
1. rootユーザになる
# su -
2. インストールファイルのダウンロード
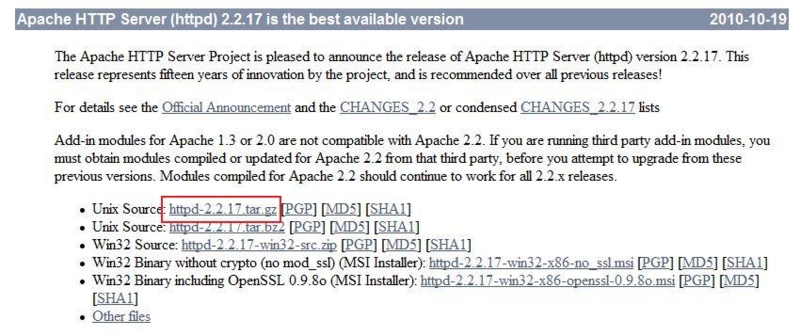
Apacheのサイトのダウンロードページにアクセスする。ページ内の「Apache HTTP Server (httpd) 2.2.17 is the best available version」という項目にインストールファイルのダウンロード先リンクが貼ってある。
[httpd-2.2.17.tar.gz]を右クリックし「リンクのアドレスをコピー」でダウンロード先のURLをコピーする。
wgetコマンドでURLを指定して、インストールファイルをダウンロードする。
# wget http://ftp.jaist.ac.jp/pub/apache//httpd/httpd-2.2.17.tar.gz
3. ダウンロードしたファイルを適当な場所に解凍する
# tar xvzf httpd-2.2.17.tar.gz
4. 解凍したディレクトリに移動する
# cd httpd-2.2.17
5. ./configureを実行する
・--enable-so: DSO(Dynamic Shared object)モジュールを後から追加できるようにするためのオプション。後からApacheにモジュールを追加する可能性がある場合、このオプションは付けておいた方が良い。DSOモジュールにはSSL通信を行うためのモジュールなどがある。
・--prefix: インストール先を指定するオプション。下記の例では/usr/local直下にインストールされる。
# ./configure --enable-so --prefix=/usr/local
/usr/lib/libexpat.so: could not read symbols: File in wrong format
エラーが発生した。
原因:/usr/lib/libexpat.soというファイルが無い。libexpat.soは、OSが32bitの場合/usr/lib/直下にあるが、OSが64bitの場合/usr/lib64/直下にある。
対応:--with-expat=builtinというオプションを付ける。
オプションを付け、再度./configureする。
# ./configure --enable-so --with-expat=builtin
6. makeを実行する
# make
7. make installを実行する
# make install
8. インストールできたかどうか確認する
Apacheは下記の場所にインストールされている。
/usr/local/apache2
- Apacheを起動する
# /usr/local/apache2/bin/apachectl start
Apacheのトップページにアクセスできるか確認する。curlコマンドを実行しindex.htmlの中身を取得できれば正常にアクセスできている。
curl http://localhost:8080/
ちなみに、Apacheのトップページはデフォルトでは下記のファイルに設定されている。
/usr/local/apache2/htdocs/index.html
- Apacheのステータスを確認する
# /usr/local/apache2/bin/apachectl status
- Apacheを停止する
# /usr/local/apache2/bin/apachectl stop
9. インストールファイルを削除する
# rm httpd-2.2.17.tar.gz
# rm -rf httpd-2.2.17
[DB::PostgreSQL]自動起動の設定
PostgreSQLの自動起動の設定方法
1. rootユーザになる
# su -
2. 起動スクリプトを作成する
/etc/init.d/直下に起動スクリプト(pgsql)を作成する
# vi /etc/init.d/pgsql
下記を記述する。
#!/bin/sh
#
# chkconfig: 35 86 15
# description: PostgreSQL

PGACCOUNT="postgres"
PGDATA="/usr/local/pgsql/data"
PGLOG="/var/log/postgresql.log"
PG_CTL="/usr/local/pgsql/bin/pg_ctl"

. /etc/init.d/functions

case "$1" in
 start)
   # PostgreSQLの起動
   echo -n "Starting postgres: "
   su - $PGACCOUNT -c "$PG_CTL -D $PGDATA -w  start"
   touch /var/lock/pgsql
   ;;
 stop)
   # PostgreSQLの停止
   echo -n "Stopping postgres: "
   su - $PGACCOUNT -c "$PG_CTL -D $PGDATA -m f stop"
   rm -f /var/lock/pgsql
   ;;
 status)
   # PostgreSQLのステータスを確認
   su - $PGACCOUNT -c "$PG_CTL -D $PGDATA status"
   ;;
 *)
   # 起動スクリプトの使用方法
   echo "Usage: $0 {start|stop|status}"
   exit 1
esac

exit 0
3. 実行権限を与える
# chmod 755 /etc/init.d/pgsql
4. 起動・停止・ステータスの確認ができるかを試す
- 起動
# /etc/init.d/pgsql start
Starting postgres: waiting for server to start....LOG:  database system was shut down at 2010-11-26 20:00:30 JST
LOG:  autovacuum launcher started
LOG:  database system is ready to accept connections
 done
server started
- ステータスの確認
# /etc/init.d/pgsql status
pg_ctl: server is running (PID: 27516)
/usr/local/pgsql/bin/pgsql "-D" "/usr/local/pgsql/data"
- 停止
# /etc/init.d/pgsql stop
Stopping postgres: LOG:  received fast shutdown request
LOG:  aborting any active transactions
LOG:  autovacuum launcher shutting down
LOG:  shutting down
waiting for server to shut down....LOG:  database system is shut down
 done
server stopped
5. chkconfig(サービスの起動・停止を設定するコマンド)に登録する
# /sbin/chkconfig --add pgsql
6. 設定を確認する
# chkconfig --list pgsql
pgsql 0:off 1:off 2:off 3:on 4:off 5:on 6:off
ランレベル3と5がon になっている事を確認する。なっているなら、PCを再起動したときにPostgreSQLが自動的に起動される。
- 参照したサイト


